Tuesday, August 15, 2006

Town Square in Sage

For the girls at Liberty's, this will look familiar. I was working on it the last few times I was able to make it down on Wednesday evenings. Sans buttons so far, I finally got the pattern to match up reasonably well on the sleeve seams. Honestly, I nearly lost my will to live, sewing and picking out stitches umpteen times.

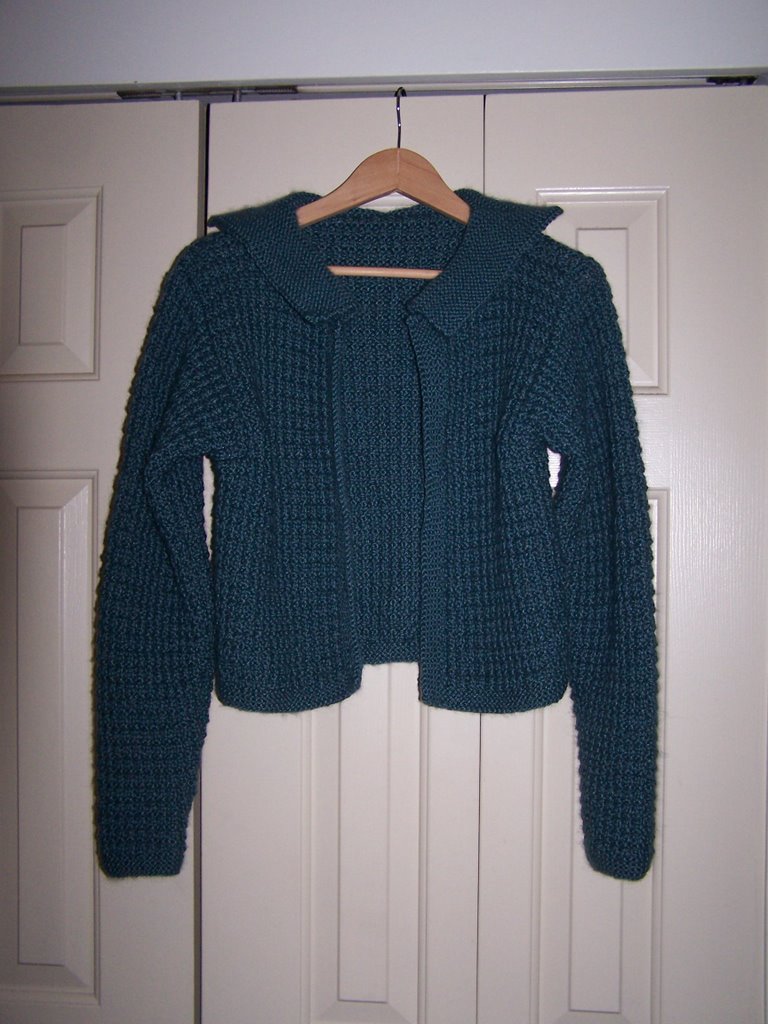
The pattern is the "Town Square Jacket" by Melissa Leapman from the August-October 2005 issue of Cast On magazine (for knitters). I substituted Debbie Bliss Alpaca-Silk Aran for the acrylic yarn recommended and then reduced the size of needles from 4.5mm and 5mm to 4mm and 4.5mm.
Without the buttons, the weight of the yarn made keeping it on the hanger for this picture pretty tricky. I was almost tempted to sew loops into the shoulders like they do for dresses that slide off hangers (but then I remembered that I wouldn't be hanging this anyway). The collar isn't shown in any real detail in the magazine picture so I was a little surprised when it came out with three corners but that's what happens when you "inc 1 st at ea shoulder seam and at center back neck". Oops, I guess EOR means "every other row". Oh, well.
The sleeves look kind of long but I'm thinking that the body will stretch out a little with time...

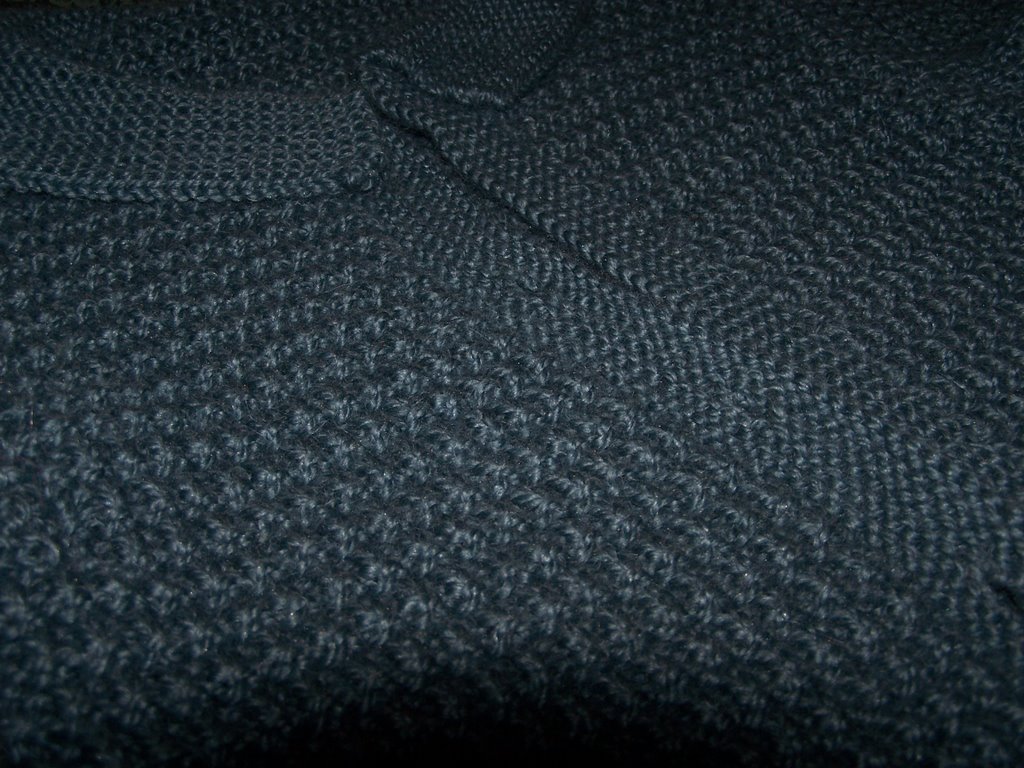
I haven't figured out how to take close-up pictures with a flash without getting the funny little shadow at the bottom of the picture so please bear with me. Casting on the button band and button-hole band turned out to be time consuming as the right side turned out to have more rows than the left. Brendan commented that I didn't seem to be enjoying my hobby as I muttered profanities over my sixtieth (not really) cast-on.

I really loved the way this yarn took to the texture of this pattern:
Row 1 (RS): *K1, p1. Rep from * for pat.
Row 2: *K1, p1. Rep from * for pat.
Row 3 and 4: Knit.
Repeat Rows 1-4 for pat.
I'll have to remember it for future projects. Love it!

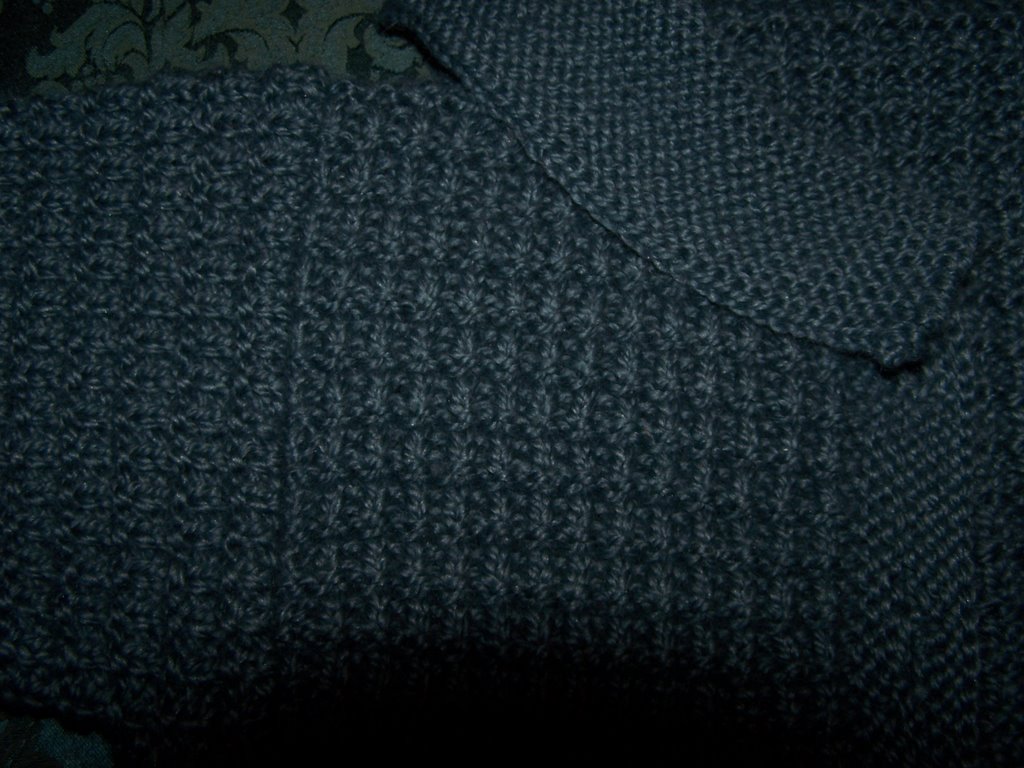
And, finally, a close-up up the three most challenging parts (after the sleeve seams) - the collar, the button-band, and the sleeve-to-body seam. Not too shabby, I think!

Friday, August 11, 2006

Zig Zag Zaniness

I've spent the past few days of unemployment trying to finish up half-done projects and so far, I'm happy to say I've been fairly productive. I hate sewing...

This is an aerial view of my completed "Stitch-effect Sweater" from Julia Cooper's Textured Knits (a book which a bunch of people at the Liberty knitting group apparently got for free while I paid for). I did this with the discontinued shade "Madame" in Rowan Cashsoft DK.

I need to find a better way (and place) to photograph my projects.

It knitted up really quickly and, as with the previous project I did from this book ("Casual Cable Sweater"), I actually enjoyed working from the charts Cooper includes.

If you look closely at this strangely posed picture above, you can see the reason I thought this pattern was so cute - the stitch pattern trails onto the back. Unfortunately, this made making up the seam even more annoying than usual...

To be Felted

I really need to get myself a copy of Emma King's 25 Bags to Knit: Beautiful Bags in Stylish Colours. The colours aspect isn't so good since many of her choices have been discontinued now but the patterns are fun and they are quick ways to use up remnant yarn. This one is "Cranberry" (ironically, knitted in Cassis shade) without the beading, which I haven't been bothered enough to try. I actually knitted it on the plane from Heathrow to Calgary and got it all done except the handles. Now that it's done, though, I've decided that I need to try felting. It's a nice enough bag but really floppy (10mm needles) and the way I load up my bags, I'll need something a little hardier. Cabling on 10mms is interesting...

First Socks

Socks have been on my to-do list for a long time. These aren't exactly what I had in mind. I've got several balls of beautiful self-patterning stuff waiting for my attention but this pattern in Julia Cooper's Textured Knits seemed to be a quick and easy way to use up some remnants (alas, see yarn story below). Anyhoo, they're done now and even full-sized.
I think I need to work on keeping the yarn tight on the short-rows. I ended up with rather lacy heels.
I don't think I'll ever be a bobble fan. But at least I can say I've done them now. :o)

Friday, August 04, 2006

A Short Yarn about Yarn

Before I left the UK, I made a couple of knitted gifts for my co-workers. For my department head, I made a sea-man's scarf in the UK Select Alpaca. Same pattern as I made for Chris Q. last Christmas. For Alice, the other Geography teacher, I made a little handbag out of Rowan Classic Kid. Now the pattern calls for 2 balls and says it is to be knitted doubled up, so I did what I thought was the sensible thing and took the strand from the inside of each of the balls and knitted it double that way. When I finished it, I had the majority of two balls of yarn left. So the other day, I got sick of the jumper I've been working on and decided to use the remnants of this creamsicle-coloured Classic Kid to make a pair of bobbled socks. I thought if I made them for smaller feet I might be able to do one sock with one ball. Well, about three rows from the decrease, I ran out. Annoyed.
Went out to a new-to-me yarn shop in West Point Grey (Urban Yarns) today who I'd called about my situation yesterday. Turns out they have an entire bag of this discontinued colour in the back. For $12.95 a ball! It's a lovely little shop but I'm having a hard time believing that I'll be able to afford to shop there anytime soon...

Wednesday, August 02, 2006

Yorkshire Kid Knit

This is a project that I've been meaning to tackle for months, ever since I saw the little sheep on the hem. It's from the Debbie Bliss "Baby Knits" book and I knew that I had to make it for Nina, my Skipton family's little girl.


I changed the main colour from the sack-cloth brown in the book to a more pastural green to emulate the Yorkshire Dales. It's meant to be a smock-style dress (no fitting or shaping for a waist), which works well with the "smocking" of the yoke, I think.
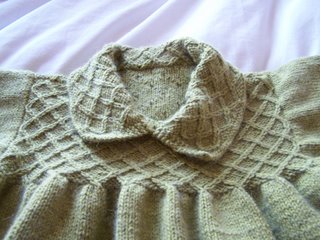
Attaching the collar was tricky, as I'm not an experienced seamstress and really resent the entire making-up process. (There are two jumpers still in pieces, awaiting my attention.)
I've always enjoyed cabling and I think the smocking came out really well.
I've never done any fair isle or intarsia work so the sheep were the most challenging aspect of this project and I decided, after the fair isle came out looking a bit tight, that I'd try both techniques. Above, are the fair isle sheep I did on the back of the skirt. The green between the sheep is buckling a bit and the material is obviously heavier with the black & white strands twisted in behind. Below, are the intarsia-style sheep. I'm calling them intarsia-style because I actually fair-isled the black behind the white in each sheep rather than create a new bobbin for the three or four stitches that make up the tail and ran the green through behind each of the sheep (which peeks out every once in a while). I think this was the better way to go as the green remained the same thickness and texture as the rest of the skirt, which is voluminous to say the least. The down-side being that there were all these bits of black and white to sew in at the end.


I wasn't sure how the little white hem was going to turn out as I don't think I'd ever done anything like it before but once I got my head around the instructions and my fingers adjusted to the pick-up stitches, it went fairly smoothly and really finishes off the look of the dress. I need my friends to have more girl babies so that I can try something like this again! But not for a while, please.

I'm hoping for a picture of Nina wearing the dress but until then, my loyal readers can put the two together by checking out this jaunty little picture of her from my main blog.